40W Fluorescent Lamp Inverter
- By Bart Milnes
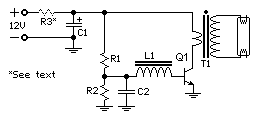
- This 40W fluorescent lamp inverter allows you to run 40W fluorescent tubes from any 12V source capable of delivering 3A. This is basically a larger version of the 12VDC Fluorescent Lamp Driver and can be used to light regular or blacklight tubes.
Schematic

Parts:
| Part |
Total Qty. |
Description |
Substitutions |
| R1 | 1 | 180 Ohm 1W Resistor | |
| R2 | 1 | 47 Ohm 1/4W Resistor | |
| R3 | 1 | 2.2 Ohm 1W Resistor (only needed once) | |
| C1, C2 | 2 | 100uF 16V Electrolytic Capacitor | |
| C3 | 1 | 100nF Ceramic Disc Capacitor | |
| Q1 | 1 | TIP 3055 or 2N3055 or equivalent | |
| L1 | 1 | See "Notes" | |
| T1 | 1 | See "Notes" | |
| MISC | 1 | Wire, Case, Board, Heatsink For Q1, heatshrink, AM antenna rod for coil | |
Notes:
1. Email Bart Milnes with questions, comments, etc.
2. Wind L1/T1. You will need an AM antenna rod that is about 60mm (2.5 inches) long to wind T1/L1 on. T1/L1 are wound on the same core. Shrink a layer of heatshrink over the core to insulate it. Leave 50mm of wire at each end of the coils.
Primary: Wind 60 turns of 1mm diameter enamelled copper wire on the first layer and put a layer of heatshrink over it.
Feedback: Wind 13 turns of 0.4mm enamelled copper wire on the core and then heatshrink over that.
Secondary: This coil has 450 turns of 0.4mm enamelled copper wire in three layers. Wind one layer and then heatshrink over it. Do the same for the next two.

3. Calibrate/test the circuit. To calibrate/set up the circuit connect the 2.2 Ohm 1W resistor (R3) in series with the positive supply. Connect a 40W fluorescent tube to the high voltage ends of the transformer. Momentarily connect power. If the tube doesn't light immediately reverse the connections of L1. If the tube still doesn't work, check all connections. When you get the tube to light remove the 2.2 ohm resistor and the circuit is ready for use. You will not need R3 again.
4. This circuit is designed for 220V lamps. It will work with 120V units just fine, but will shorten the life of the tube.
5. This page has been extensively rewritten by Bart Milne. (15/3/01)
Back To Circuits Page | Mail Me | Search

